

|
|
Some of the most common problems with the PSX is skipping video, skipping audio, poor action during play or not reading disks. Here is some of the most common solutions to repairing your PSX. DOES YOUR PSX DO THIS? The most common fault with the PSX is skipping, not reading disks, poor play action and poor full-motion-video (FMV) at the beginning of games. The problem sometimes gets worse the longer the machine is on. The CD-ROM mechanisms in earlier PSX's has a common flaw, which shows itself in the initial stages as skipping FMV (full motion video), and streaming audio such as background music during gameplay. In the middle stages, worse skipping is exhibited, plus longer loading times and random hanging and abortion of FMV playback. In later stages, the mechanism totally fails to read data from a CD-ROM. The screen will go directly to the blue Memory Card/CDplayer section instead of the black background with the Playstation logo. Turning the PSX upside down sometimes helps. Does this sound like your Playstation? Skipping occurs when the laser optics can't track or read the data on the disk. The problem is more apparent in earlier versions of the Playstation, Sony tooks steps to combat this problem in later revisions of the machine. The very first edition of the PSX (Model Numbers SCHP 1000, 1001, 1002) was the worst for this problem. These early models used plastic parts in the laser unit (described later ) which over time, became worn. The later versions of these machines (Model Numbers SCHP 1000, 1001, 1002) came with a modified laser unit that used die cast alloy parts instead of plastic. The latest revision of the PSX the SCPH-550x series and it seems to be problem free and no adjustments should be made. Please Note: The problems are more apparent with copied disks because they can never reflect the laser back as efficiently as an original disk. This is because CD writers cannot burn the pits that form the data on a CD-r disk as cleanly as you get with a pressed disk. You can proceed with the procedure below or order the "Atlas Kit" that basically does the same thing but replaces the sled. You can order the kit from here: http://www.werewolf.net/~vdospec/playstat.html
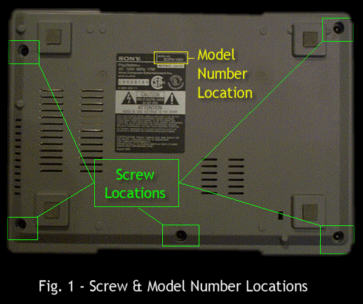
DO YOU HAVE AN EARLIER MODEL? Disconnect all power to your PSX and carefully turn it over and check the Model Number to determine if you have an early version - Model Numbers SCHP 1000, 1001, 1002 (Fig. 1).
If you have an early model PSX, then your
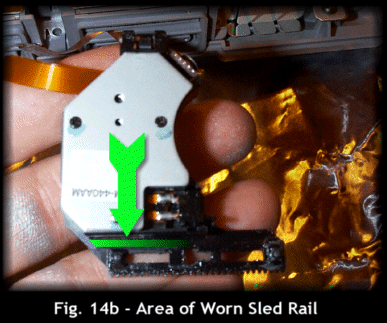
problems are probably coming from a worn laser sled. The sled holds the laser and moves
back and forth to read the CD. Over time, it wears a small groove in one side and begins
to tilt or sit lower than the other side. It may or may not be noticable to the naked eye.
The worn sled causes focusing problems which cause the
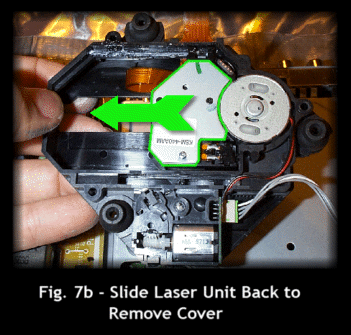
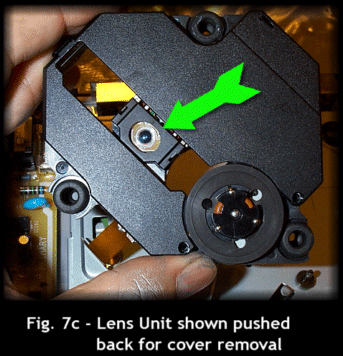
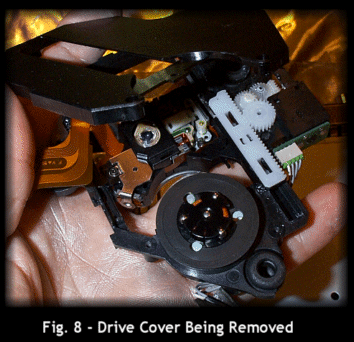
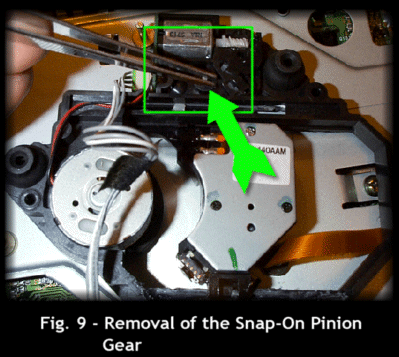
skipping. I am not an electronics engineer or a rocket scientist but I do like to tinker with electronic things. I believe anyone can perform the following procedure if they work slowly and patiently and take time to notice what they are removing and where it goes. This is not a "fix all" guarantee but, it did fix our PSX system and many others too. Remember to disconnect the power supply if you attempt this repair. I am not responsible for any damages. Basically the repair will lift the side of the laser
sled that has dropped because of sled wear. The best way to achieve this is to
dissassemble the laser and add a small piece of thin sheet metal between the sled. The
trick is to make the sled that carries the optics (lens) level or parallel with the CD,
and all you need to do is devise something to make it level again. Step 2
Step 3
Step 4
Step 5
Step 6
Step 7
Step 8
Step 9
Step 10
Step 11
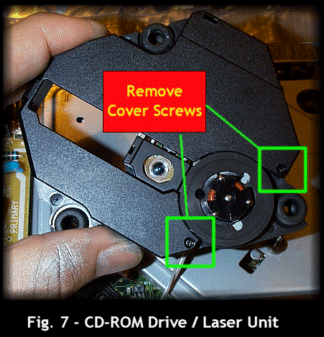
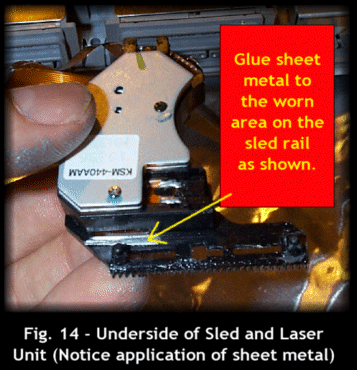
Step 12 To fix the problem we need to make the sled perfectly horizontal again, the simplest way to do this is to add a small piece (approx 3mm by 5mm in length) of sheet metal around 0.3mm thick to the sled unit at the position shown in the diagram below. I used the metal cover from an old floppy disk and then cut off a small strip with a sharp pair of scissors. Clean the area removing any grease with a Q-Tip and alcohol before gluing. The sheet metal piece can be glued in place with a tiny amount of super glue or other type of glue. It is a bit tricky to fit the metal in the small area, but it can be done see (Fig. 14). The metal doesn't have to be the full length of the sled.
Step 13 This repaired my PSX and now it runs just like new. If this does not repair your system, you may need to Adjust the BIAS and GAIN. However, this should be done with great care. I will have more information soon on this separate procedure.
|

Designed and
Maintained by Brad Buttry |
|